Table of Contents
Introduction
It’s super hard. Pulling some extra mile performance with regular shotshells is really difficult.
That’s not all-
Things get even more difficult when it comes to pistol shotshells. Because of this experts get into using customized shotshells to increase the shooting efficiency and effectiveness.
But there’s a catch-
It’s really tough to find the best road to homemade pistol shotshells. So, how to make these shotshells?
Well, start by collecting all the tools for your DIY shotshells. Craft your own shells and prime them so it’s easy for you to fit in the rim. Then go ahead and charge your shells with gunpowder and load it with lead shots. Finish by crimping the shell’s mouth and cleaning it.
These were just the basics. To get an actual grasp of the process, read through our article. We’ve designed a stepwise process for making homemade shotshells for beginners.
Homemade Pistol Shotshells (7 Effortless Steps)
Source: https://www.quora.com/
Making your own shotshells may sound difficult but why not give it a try? These 7 detailed steps will answer all your queries regarding making your own pistol shotshells. So what are you waiting for? Let’s get into the details.
Tools Required
Before you dive right into the steps, these are the tools you’ll need to make your own pistol shotshells. So, make sure to carry an adequate amount of these.
Step 1 of 7: Crafting The Shells
Making your own shells can be troublesome and expensive. Because the brass case is one of the most expensive tools in the ammunition process. Hence, reusing your old shells could be an ideal option for you. So, if you were wondering what to do with empty shotgun shells, now you know.
However, if you want new shells for your pistol, you can also use DIY methods. To make your own shells, you can use brass tubing readily available in most craft shops. Cut these shells into 19.15(.754) with the help of tube cutters.
Looking for a sharp tube cutter? No worries! Here are some recommendations that will help you to cut the tubes effortlessly.


For a 9mm caliber handgun, it is 9.02mm, so you can keep your tube of that diameter. At this point, your shells are almost ready for use.
There is also a cheaper version of making these shells in case you’re running low on cash. Make your shells using hard paper tubes. You can use these thick paper plugs to attach to the bottom of those tubes. And finally, use a circular disc made of hardened paper to make the rim. Voila! Your cheap shells are ready.
But there’s a catch- these paper shells are very weak and vulnerable to moisture. Thus, they swell up and stick to the chamber. And if they get too soggy, the gun may fail to fire. So you might have to use very hard paper to handle this situation.
Step 2 of 7: Priming The Shell
Now that your shells are ready, whether it’s the paper shells or the brass ones, it’s time to prime them.
Firstly, clean the entire shell. If you’re reusing your old ones, make sure to remove the old primers and leftover powder. The best way to remove them would be using sandpapers as the leftovers are already loose. For the best outcome, you check our recommended sandpapers here-
- Fandeli 60 Grit Sandpaper Sheets – If the leftovers are persistant
- Fandeli 80,120, 220 Grit Sandpaper Sheets – If the leftovers are comparatively loose
The correct measurement of gunpowder is also very important. Hence cleaning the remaining one is a must.
Also, you can use a cleaning kit such as Firecear Gun Cleaning Kit. This kit comes with sturdy adapters, slotted loops, cleaning rods, jags.
Now to put your primer back into the shell, you can use an adapter with your press or use a priming tool.
At this moment if everything sounds so gibberish, you can watch this video to ease things up.
So, what to do if you don’t have a tool? Can you reuse bullet casings for this?
Definitely. You can use a blank cartridge and two brass tubes. Coat the outer surface of the cartridge using a high-strength retainer. Press it into the tube. Use the retainer again to press the tube containing the cartridge into the larger tube. Let it harden.
Now that the tubes are ready, apply the retainer (bearing adhesive) to the outer surface of the priming assembly and press it into the shell. Make sure the primer is level with the end of the shell.
And here are our top choices of primer for shotshells so you don’t have to fret over it-
| Name | Image | What's Good? | Price |
|---|---|---|---|
| Winchester #209 Primers For Shotshells |  | Quantity: 100 Good sensitivity More positive firing | Buy from BassPro |
| CCI Standard Primers |  | Quantity: 100 Non-corrosive Clean-burning for more accurate shots Easy to apply | Buy from Cabela's |
Step 3 of 7: Fitting The Rim
Now, it’s time to fit the circlip to the base of the shell.
Here’s the thing-
If you’re using a 9mm cartridge then the rim of the shell should be 9.98.
The 9mm clip is secured at the end of the tube using retainer or solder (either conventional or solder paint). At this point, the clip can be trimmed in order to fit the shell to ensure securing it correctly.
Step 4 of 7: Charging The Shell
Now that you’re done fitting the rim, it’s time to get into charging the shell.
To charge your shells, you’ll need to make powder wads. To do that you can cut out discs of the size of your tube from a thick cork sheet. Once you’ve taken out the wads, insert them into the charge.
But wait! Before you insert the wads, you must charge the shell with powder. You can use black or smokeless powder. You can also make your own black powder using the recipe below.
Black Powder Recipe
To make black powder, use 20% charcoal and 80% potassium nitrate to make your black powder. The purity of these elements must be authentic for the proper outcome. You can check our recommended items here-
- Jealous Devil All Natural Hardwood Lump Charcoal– No sparking, no popping, and low ash
- ESKS Potassium Nitrate– Excellent for Pyrotechnics
The charcoal acts as a fuel and the potassium nitrate acts as the oxidizer.
To make the charcoal, you can simply burn some wood in a reduced oxygen environment. Careful! Don’t burn yourself down in the process.
Don’t try to make your own potassium nitrate because it’s not going to help you save money. So buy enough potassium nitrate for the mixture.
Mix the two ingredients and sieve/sift it through to make the powder even and uniform.
Caution: Make sure to use the right amount of powder for your shell. You don’t want to blow your hands off. You might need to know how many grains of gunpowder there is in a pound to measure the right amount. For 9mm ammo, the ideal range is within 6.3-6.8 grains of powder per round. Which is about 53 gains in total.
Once you’ve charged the shells with powder, insert the two wads and tamp them firmly over the powder.
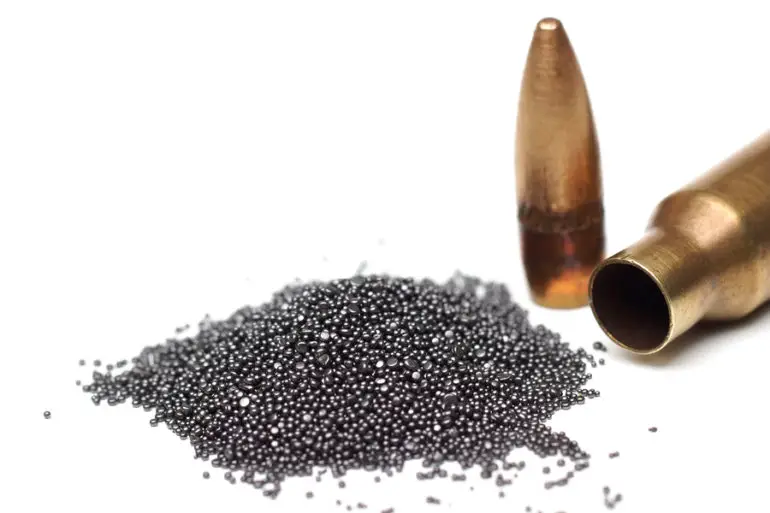
Step 5 of 7: Loading The Shell
It’s time to load up your shell with shots. Probably the most exciting part of the ammunition process.
Charge your shell with lead shots or steel shots. But make sure that the top of the charge is right below the shell mouth.
In case you’re wondering “How to make your own shots?” We’ve got you covered.
Here’s how- At first, meltdown the lead and put it into a buckshot mold to make your perfect shots.
But even if you can’t get your hands on the mold, you can simply drip the molten lead into water to make little balls of lead. They may even turn out perfect if you’re open to a little experimentation. That’s not all-
Let me tell you something, making lead shots is pretty easy. But the challenge here is finding the lead itself. Now buying lead at a large scale is the best option. You can get some quality lead shots out there right away. But if you’re looking for cheaper alternatives, you may have to search around junkyards and auto shops. These places always have spare scraps of lead. This makes the whole process quite cheaper.
Step 6 of 7: Crimping The Shell Mouth
Now that the hard part’s done. All you are left with is crimping the shell mouth. For that, use a hot glue gun to seal the shell.
Fill the end of the shell mouth with glue and score the inner wall using a sharp object to provide a foundation for the glue to stick. The glue will seal and crimp the shell altogether.
Step 7 of 7: Cleaning The Shotshell
At this point, your homemade shotshells are ready. You just want to wipe away all the black powder and debris to make it look shiny.
Use a solvent and lubricating oil to keep your weapon clean. Most gun cleaners contain these two.
If you’re camping out and you run out of gun cleaner. What to do?
You can use gasoline, kerosene, or even soap and water as an alternative to clean powder and lead fouling. For lubrication, you can go for red grease, motor oil, or even vegetable oil if you have it.
Or you can just directly buy an all-in-one gun cleaner. Kindly go through the following table to get some best recommendations we sketched only for you.


And there you go. You can put on your Tilley hat, carry your pistol and start out camping. Because making your own ammo is totally worth it as it’s going to protect you from animals like snakes and other rodents.
Homemade Ammo Storage
Now that you’ve made your own ammo, you’ll also have to take good care of these.
We’re pretty sure you’ve made enough shotshells to cover the rest of the season. Hence, storing these buddies properly is vital. Something we often overlook. So here are some tips for homemade ammo storage–
Tip 1 of 3: Keep It Dry
Storing the ammo carefully and in the right environment is very important. Keep your ammo in a place where it’s completely dry and lacks humidity.
Moisture inside the box causes the primer to hold water affecting the cartridges and shells. This results in the shells corroding and becoming inoperable. There is also the risk of the box catching fire in case the walls of the homemade bullet cartridges become weak.
Tip 2 of 3: Keep It Cool
Many people aren’t aware of this particular tip. And that’s why they make this mistake I’m about to tell you.
People often keep their bullets or ammo inside the attic, the trunk of their car, or even inside the car out in broad daylight. Which is very harmful to the shotshells as these places could be pretty hot.
High heat usually above 150-160 degrees can damage the potency of gunpowder in your ammo literally making your bullets useless. So always keep your ammo cool enough but not necessarily cold.
Tip 3 of 3: Keep It In Dark
Keeping your ammo in the dark is an essential part of storing. High and long-term exposure to UV light can damage the inside of the ammo. It also deteriorates the exterior.
Hence, keeping ammo in the ammo box or its original packaging is the ideal way to store them. So make sure when you’re carrying them in a rucksack or an assault pack they are stored in the right compartment.
FAQs
Question: Do homemade pistol shotshells work?
Answer: Homemade pistol shotshells work just fine. These shots penetrate pop cans completely and are even handy for small birds, snakes, and rodents.
Question: Does 9mm make snake shots?
Answer: The 9mm snake shot contains 12 shots. This is much smaller than the shot used in a shotgun shell. Each pellet is equal to 0.25 grains.
Question: Why is a revolver better than a pistol?
Answer: Revolvers are better because they can fire larger calibers and are heavy so these are good at absorbing powerful cartridge’s recoil.
Question: What to do with old shotgun shells?
Answer: You can dispose of old and used shotguns in the following 3 ways. You can hand them over to the police for their disposal program. Give them to any shooting ranges or shoot the old shells.
Conclusion
That’s all we had to offer. By now, we hope you’ve had a good idea on making homemade pistol shotshells.
Making your own shotshells and handling them isn’t easy. But we’ve provided you with the easiest and most convenient method. So follow through our steps and enjoy making yourself some pistol shotshells.
Let us know how well this method worked for you by leaving a comment down below.